Content
7 Tips and Tricks To Speed Up Your Workflow in Adobe Illustrator

This is aimed at those who are already familiar with Adobe Illustrators’ interface.
Deadlines. Whether it’s for your client or your grandma’s birthday, we’ve all met a tight deadline. As for my fellow Illustrator users, here are some nifty tips and tricks to speed up your workflow. This blog will introduce some of the more uncommon features inside Adobe Illustrator, and to help out those who have been using Illustrator for a while or who is curious about learning something new.
1. Hotkeys
Hotkeys are the cheat codes for executing any main task. Many programs usually have hotkeys assigned to an action that is used inside the software. You’d be surprised how much back and forth you do, so to cut down on time, we need as many shortcuts at our fingertips.
Some notable hotkeys:
A/V – Direct selection(For editing)/Object selection(For moving/transforming)
Position selected object – Arrow keys (+ shift to move every 10 pixels)
Pan (space)
Lasso selection (Q)
Scale (S)
Rotate (R)
Colour Pick (I)
Group/Ungroup – cmd/Ctrl + G, cmd/Ctrl + Shift + G
Cut, copy, paste – cmd/Ctrl + (X, C, V)
Paste in place cmd/Ctrl + Shift + V
Select All – cmd/Ctrl + A
Repeat last action (cmd/ctrl + D)
Move the object in front/behind cmd+[/]
Move object in front of everything/behind everything cmd + [/] + Shift
If you find yourself sighing at the screen after doing a 30-second manoeuvre with your mouse cursor, you may want to reconsider learning that particular hotkey.
2. Symbols
If you’ve ever used Adobe Flash, symbols work in a very similar fashion.
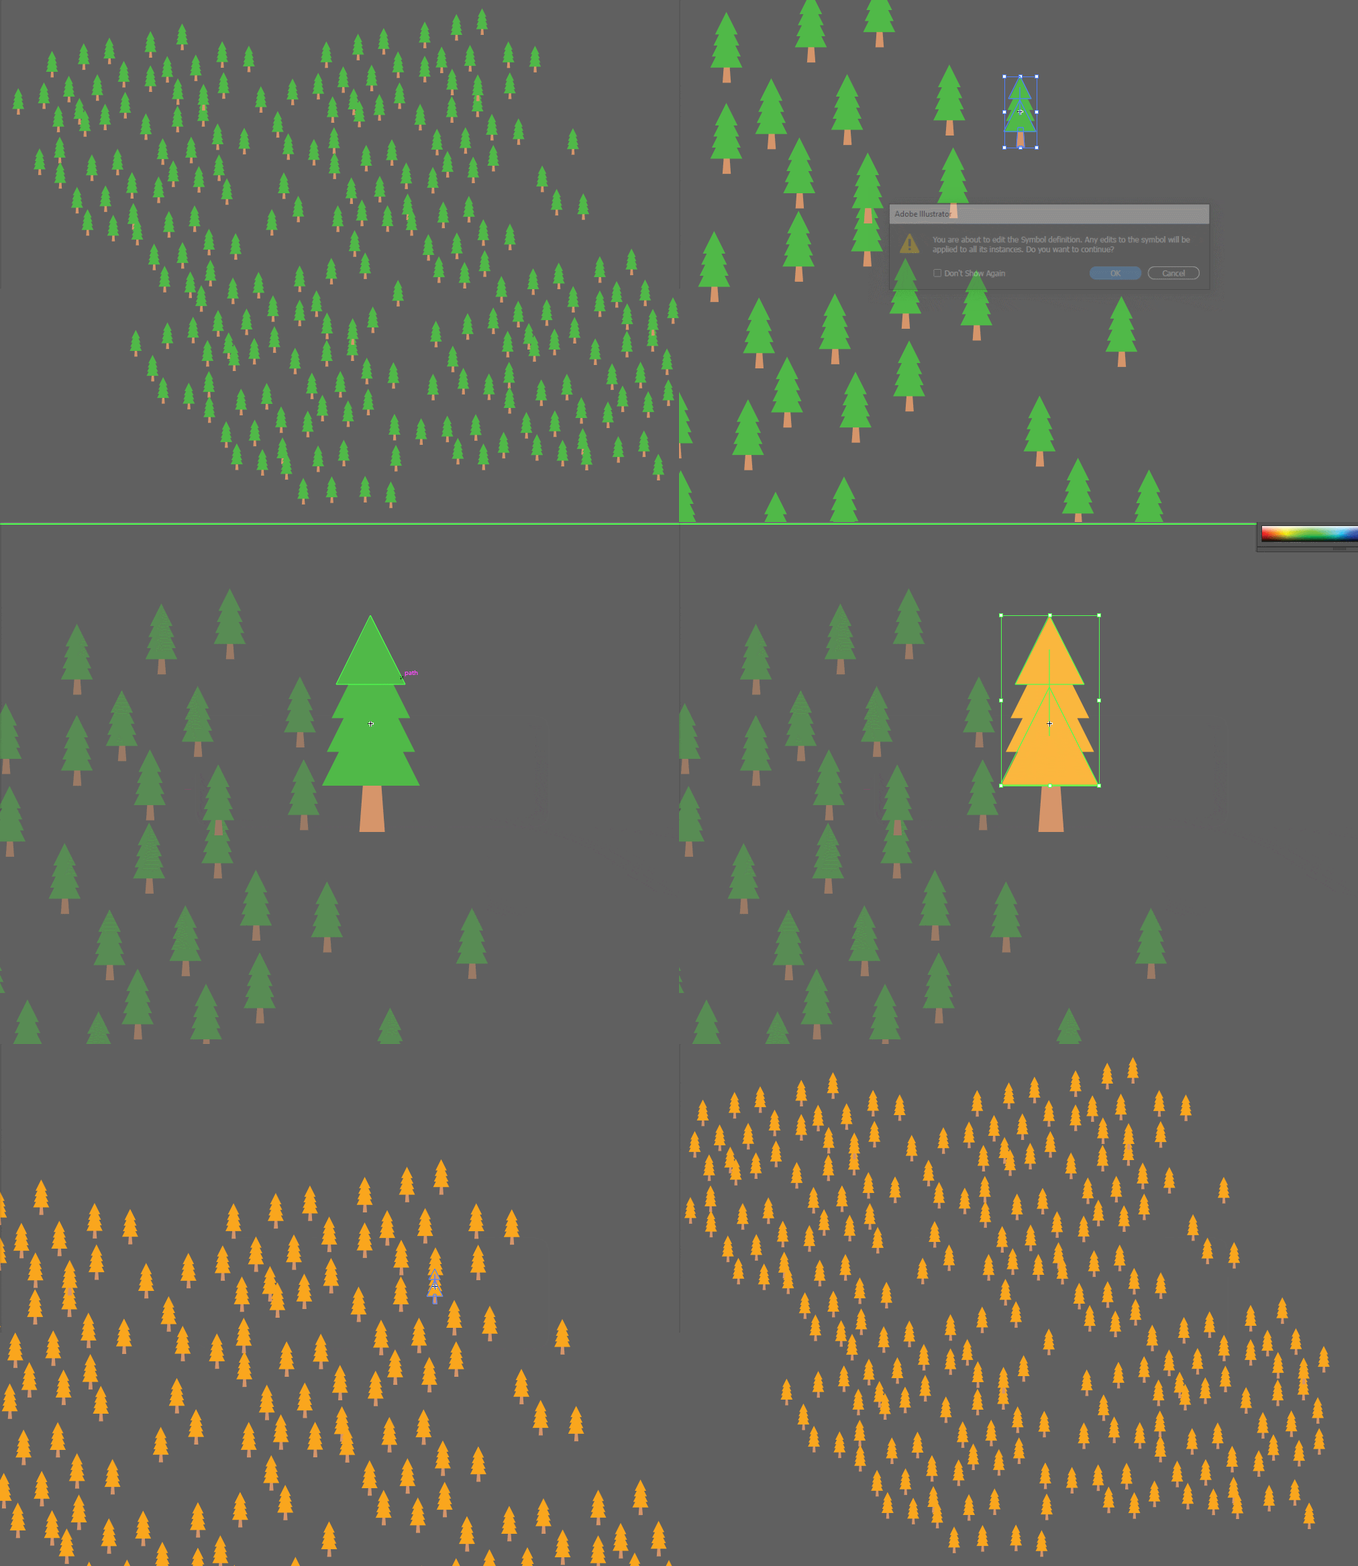
Here’s a small scenario: you’ve been asked to illustrate a forest filled with trees. 200 of them, in fact. You make the first tree with the magic of copy and pasting, job done. Right?
The client comes back and tells you they want that green tree to be orange. You amend the tree colour and delete the others, then replicate them in to be in the same position. A better way would be to select the trees and edit colours, swapping them out for the new ones. This is probably the way I would do it with a low number of trees. However, we’re working with 200 and this method will eventually slow down your computer if not powerful enough.
This is where symbols come in handy, as it is less intensive on the computer and performs a lot better since the trees are instances based on the one symbol you created. To do this, after creating your tree graphic, open the symbols tab (Windows > Symbols), then drag your tree into the panel. Name your symbol ‘tree’ or something and choose the graphics option under the export type, then apply the setting. The symbols panel will show your newly created tree. Drag that out onto the stage and duplicate the symbols however many times you need. The next time you need to change that colour, you can change any of the trees you’ve made and it will affect every other symbol you’ve copied from the tree symbol.
3. Blend Modes
My favourite tool in Illustrator. Imagine building the Great Wall of China. Now, imagine building the start and end point and have everything filled in automatically in-between. This is essentially what this tool does.
What’s even better is that it works with colours and morphing shapes. Blend mode works best with the object’s position, scale, colours, opacity, and basic shape morphing. If you are morphing the shape, it works best when the number of points is the same as the original shape you are trying to blend.
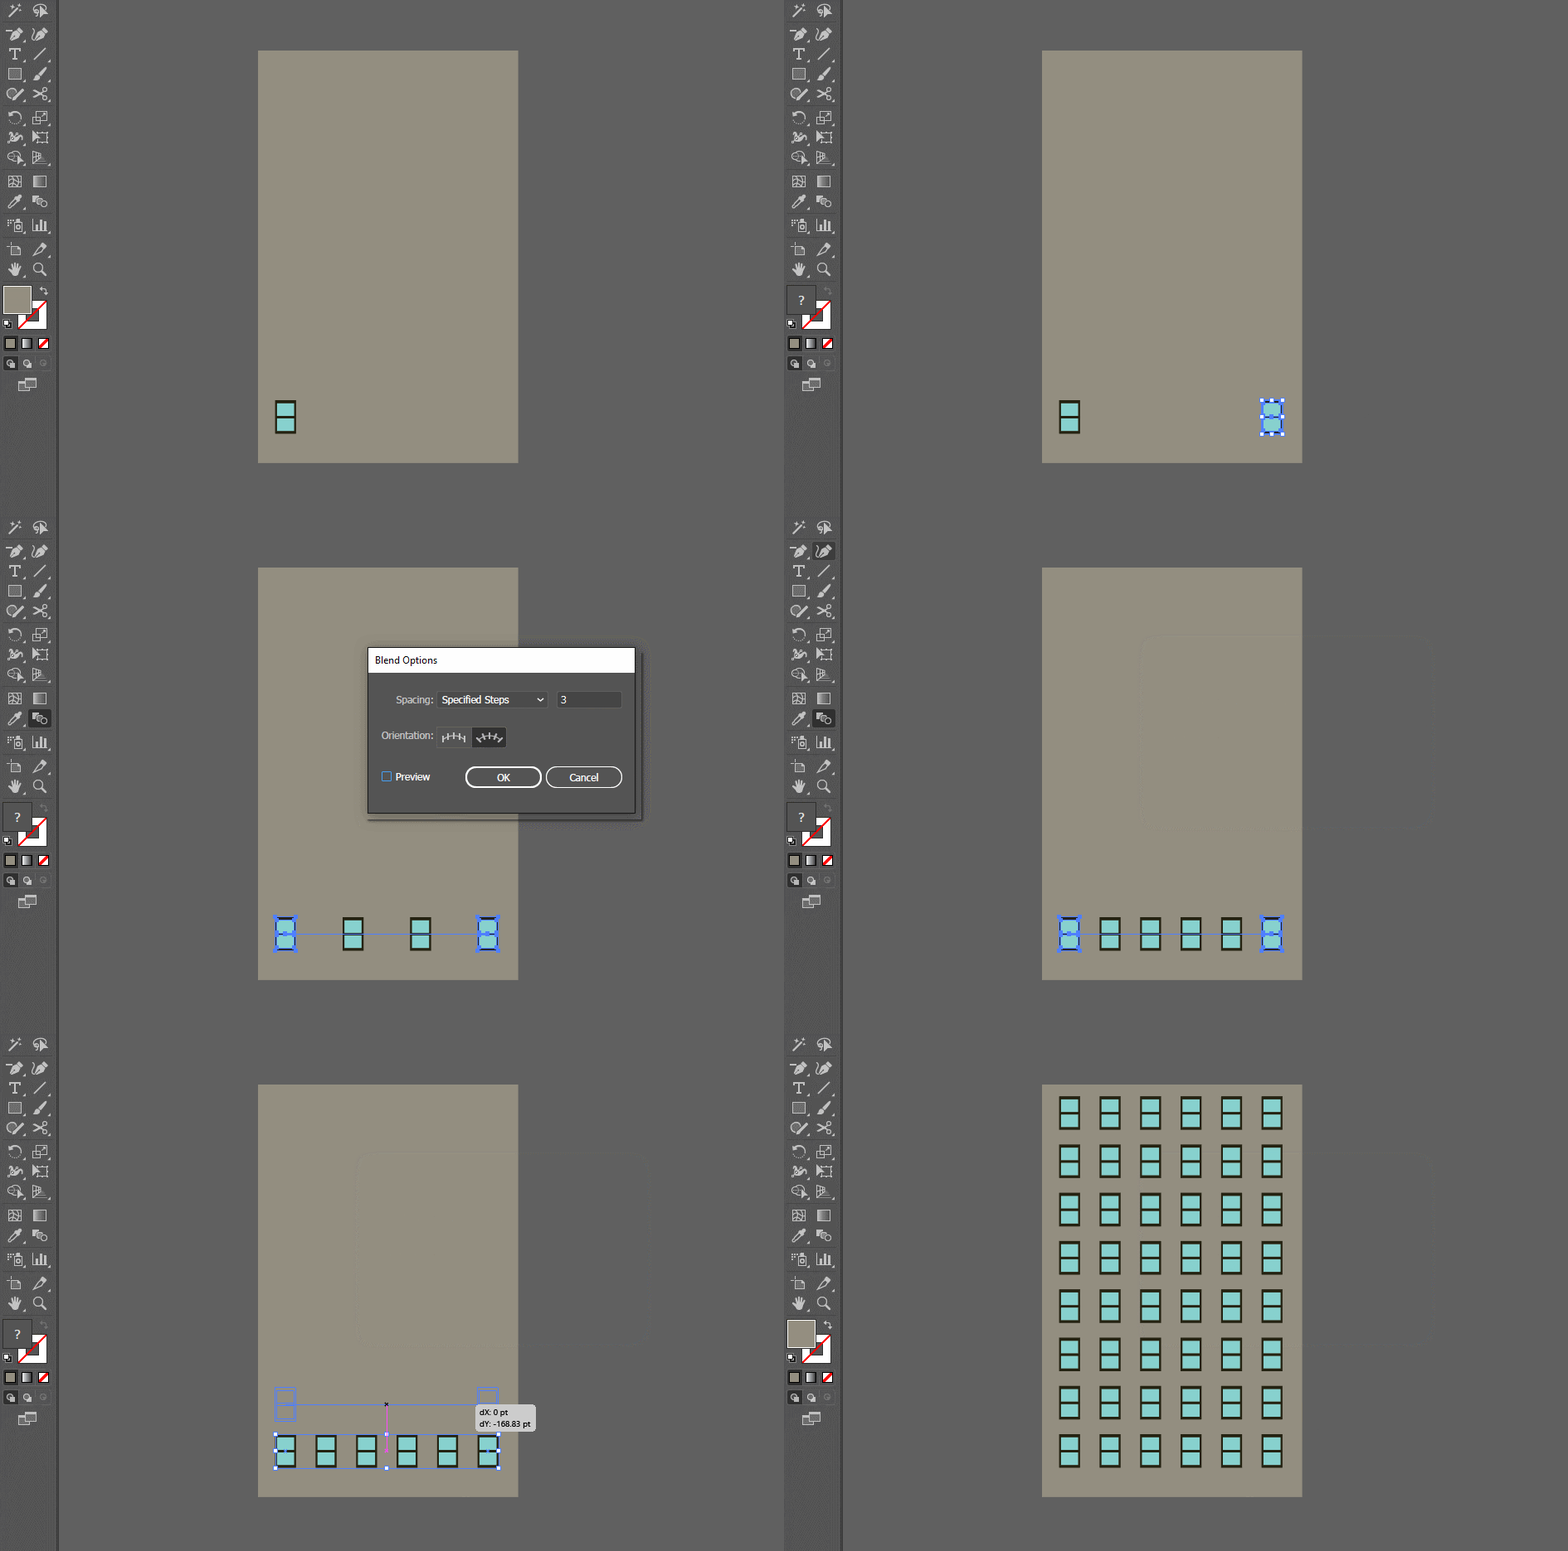
Here’s an example of how you might use it. Let’s just say we are creating an office building. These buildings tend to be several stories high, with hundreds of glass windows. Create a window and duplicate it; these will be the start and end point. Position the start and end of the windows by the sides of the building. With the blend tool selected, choose the windows you want to have ‘filled’ in-between for you. You can also adjust the number of windows in between, by double-clicking on the icon itself and applying some parameters.
4. Recolouring Artwork
Recolouring your vector art illustrations can be a tedious task if you’re not using the ‘Recolor’ tool. This can be found in the properties panel, but it does not work with normal images such as a jpg/png format.
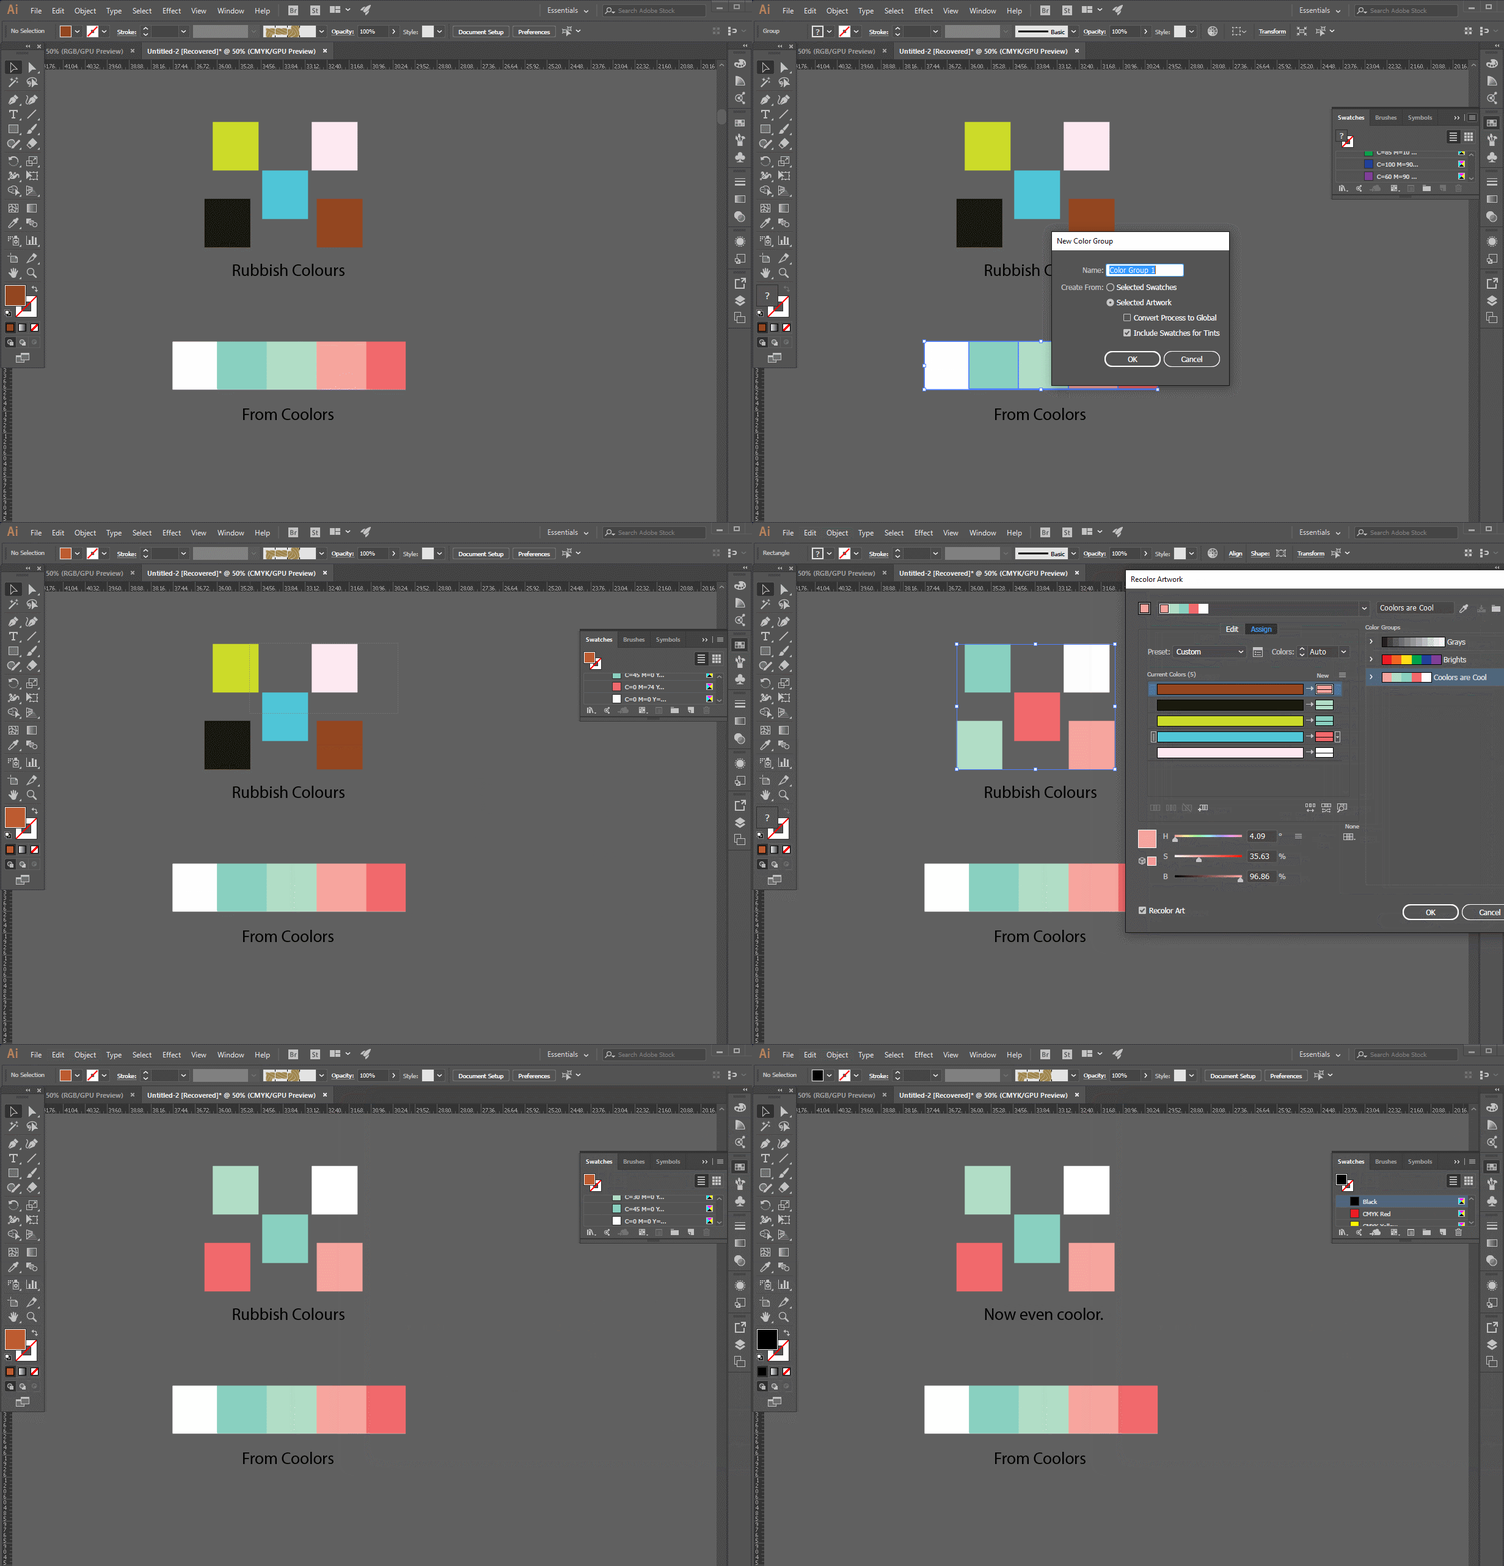
This is a fantastic time-saver recolouring your artwork, but it can also be used to try out new colour schemes. For instance, you can pick a colour scheme using websites such as coolors.co or color.adobe.com, then print screen your favourite combinations or use the hex codes for the file you’re working on. Select the colours you have imported, and go on the Recolor Artwork window – which can be found under Edit > Edit Colors > Recolor Artwork. This shows the colours you have selected or colours you could reassign. You can also make a group by clicking on the folder on the top right or make one in the swatches panel by clicking the drop-down menu then choosing ‘New Color Group’. Be sure to give the colour scheme a name you remember and hit OK. Now the next time you want to use this colour scheme, all you would need to do is select your work, go back to the Recolor Panel, and click on the colour group you have made. This will reassign your artwork with your newly created colour scheme. You can change and swap the colours around by dragging any colour under the ‘new’ column. Or if you’re indecisive like I sometimes am, you can randomly change the colour order which might help give you a different perspective.
5. Scripts
One thing you might want to look into are scripts that you can run in Illustrator. Scripts are generally used for experimenting or workarounds that Illustrator does not feature in its core program. There are plenty of free scripts online, many of which might be useful, here.
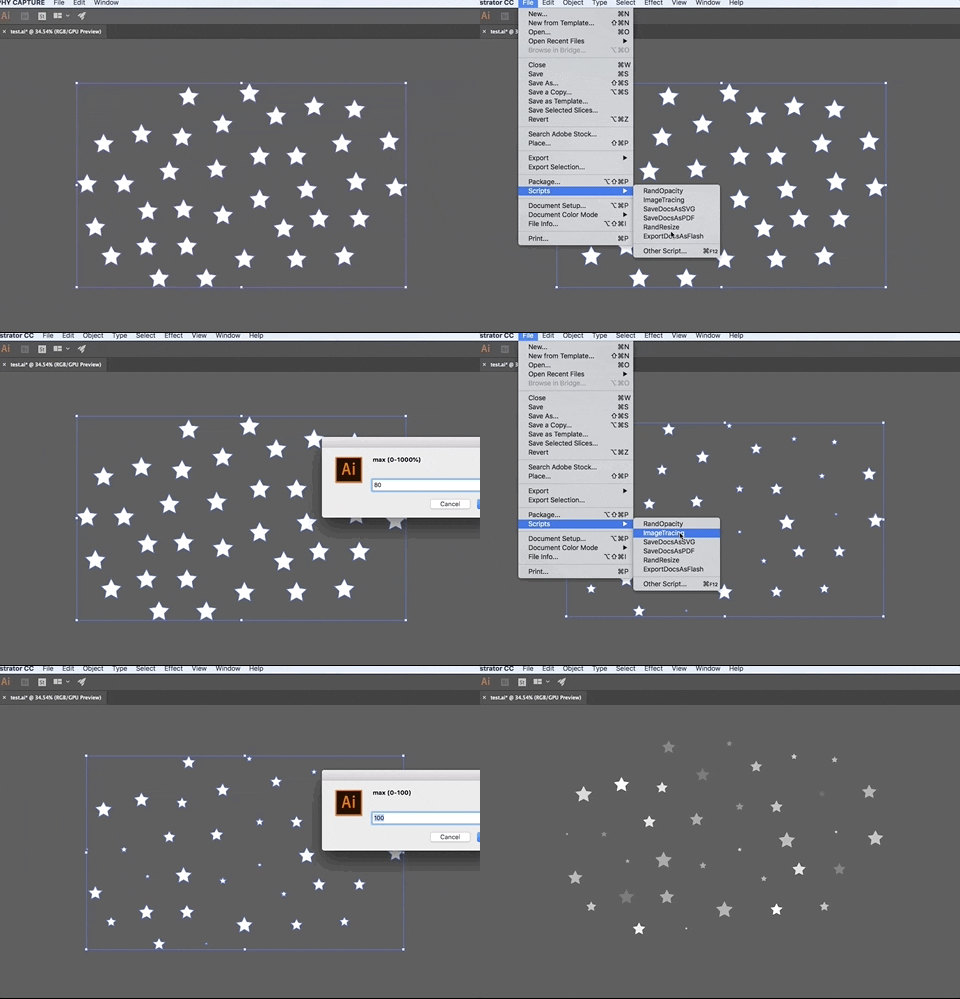
After you’ve found a script you would like to try, make a scripts folder and place it somewhere you can remember it on your computer. In Illustrator, to use the scripts, go to File > Scripts. If it’s not listed, choose Other Scripts and locate the file. Each script has a specific way of using it, but in this example, I use two scripts. One for random opacity and the other for random resizing. I input two parameters for the minimum and maximum size of the objects, then the rest works like magic.
Scripts have so much hidden potential. It is gold when they can solve our many problems and save a lot of our working time, so definitely have a look at them if you want to boost your working speed.
6. Pattern Brushes
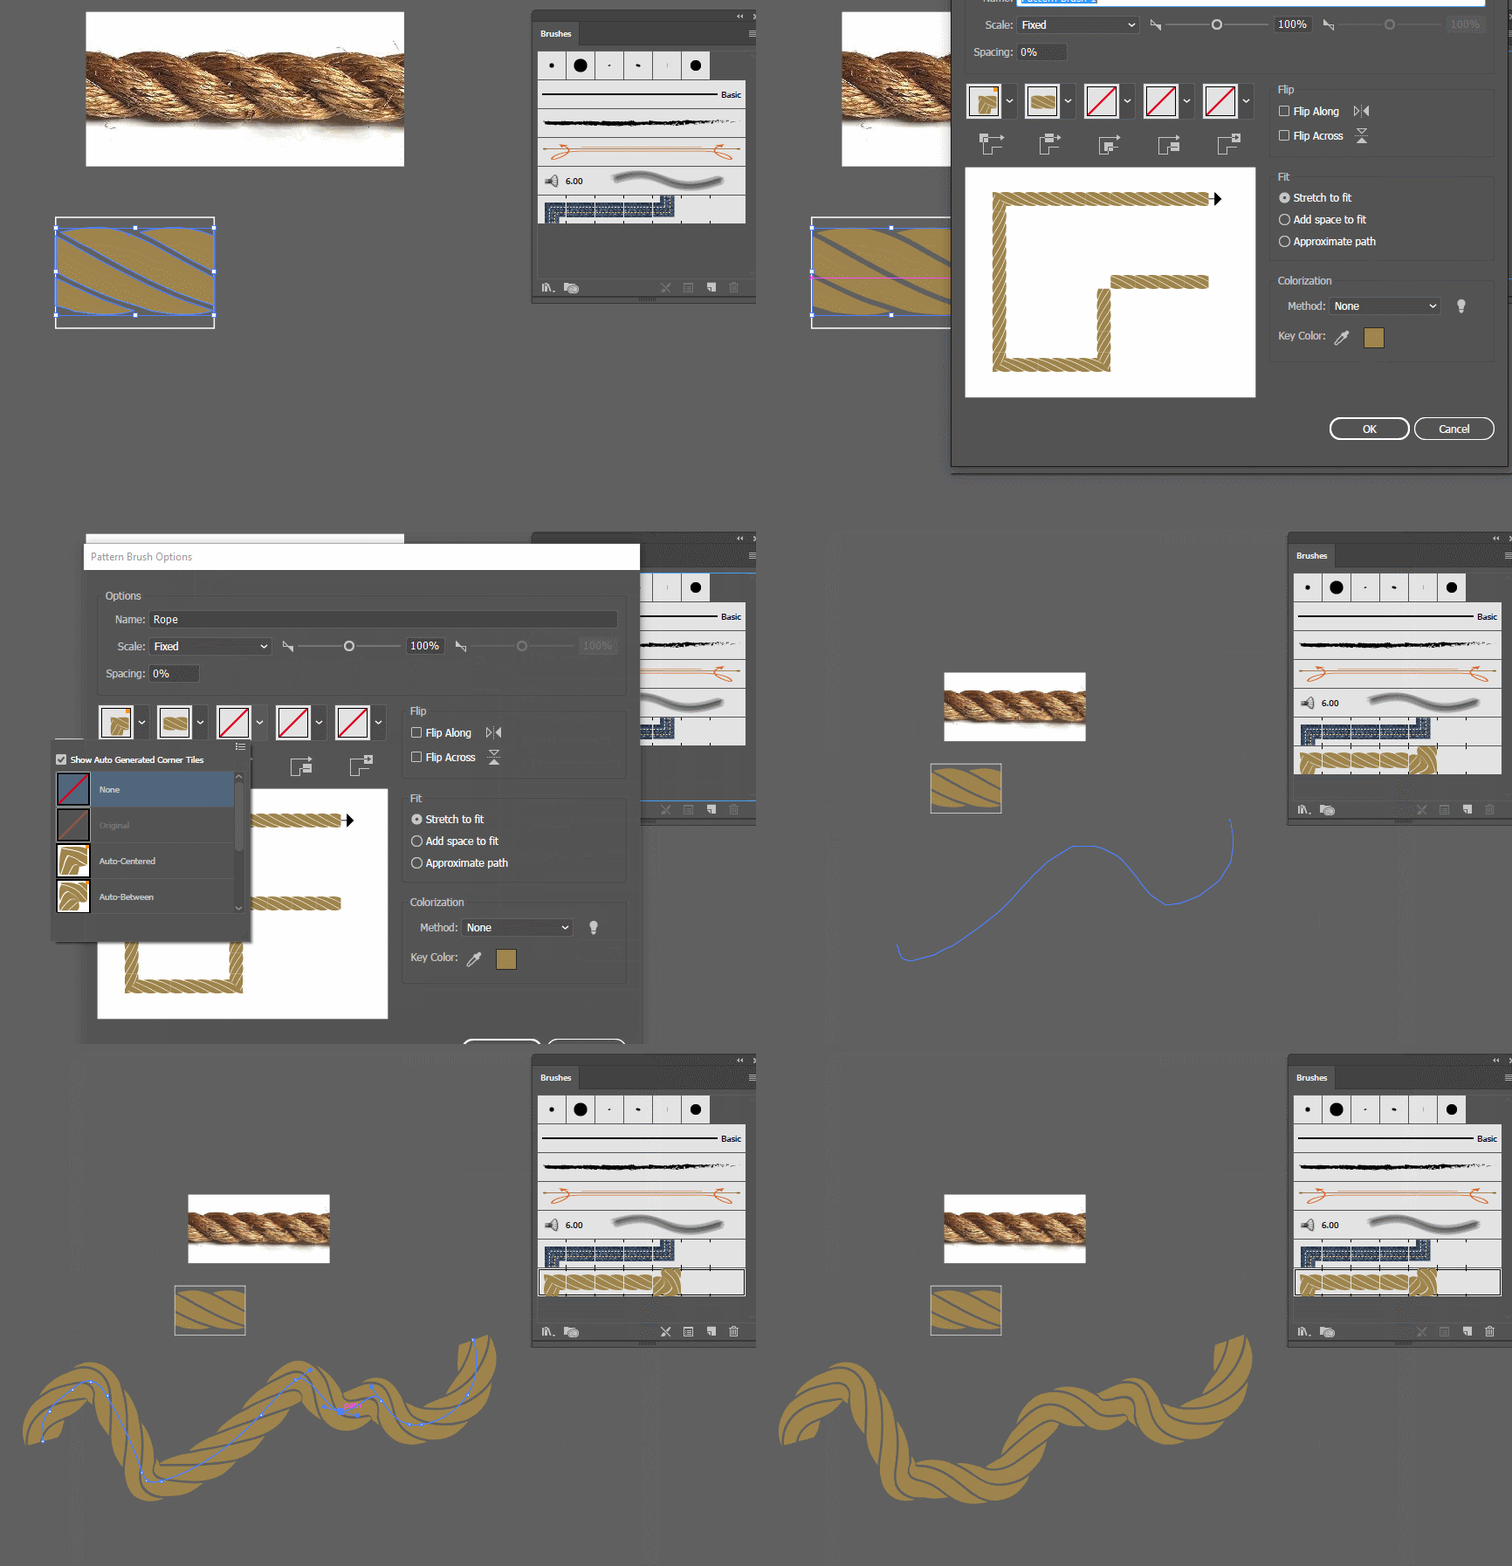
This is another time saver, especially designs with a repetitive pattern that follows a path. Let’s take a rope for example: drawing the braided pattern manually would take hours. Look for patterns and see if you can spot which parts repeat themselves. This is where you create a tileable graphic that we will use later. A technique for making tileable objects is to ensure the ends of the points are lined up inside a box. You can quickly see whether it tiles well or not by duplicating it horizontally. After you are happy with the tile, with the Brushes panel open, drag the selected object on to it. Choose the ‘Pattern’ Brush, which will then allow you to make some final adjustments to the spacing and customise the way the tile bends around sharp corners. Test your pattern by drawing a path, then with the path selected, choose the pattern brush you have made in the Brushes panel. If done correctly, you should have a seamless rope brush to use!
7. Puppet Tool
If you draw a lot of characters or organic designs, this tool can save a ton of time reposting your illustration. Use this after you’ve created the main illustration. You can then reposition your characters by adding nodes onto the selected work. These nodes act as a pivot point and allow you to warp and manipulate your design with ease. The triangular cage surrounding the selected object shows how much detail the vector design has, so you can blend the poses better. Place the nodes as if they were part of the joints in the human body, – that is, place points where you would need to bend.
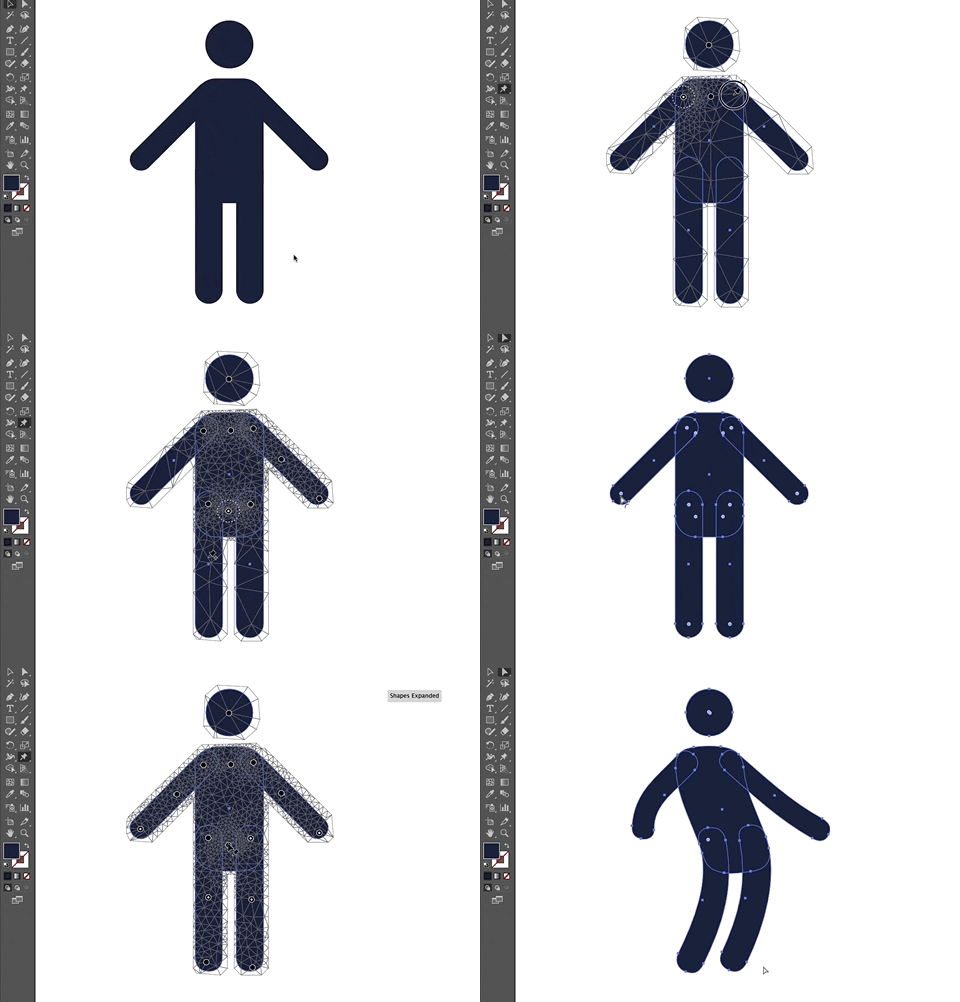
You could also use the puppet tool to create an organic object. Rather than the traditional way of making a rock, for example, we can start with a simple box shape and use the puppet tool to push and pull things around to get a general shape. You can edit it as normal too after roughing out a shape, which can be quite a powerful workflow if you want to give that a go.
Hopefully, some of these tips and tricks have helped some of you out there.
Share

